General - Sage Timberline Linked Database
Sage CRE or better known as Timberline uses a Pervasive Database as its database engine. To provide effective, timely reporting combining the timberline data with IPM data certain configurations must be put in place prior to producing any reports that are based on transactional information.
The following assumptions have been made with regards to this topic.
- The target Timberline installation is on the local network and not configured on a separate network as would be the case if IPM was running in a hosted or online environment whereas Timberline is on premise.
- The version of Timberline being used is version 13 or greater and as such the Pervasive 64bit ODBC driver is available.
- The data to be accessed is available using the Timberline provided DDF (Data Dictionary Files) .
Creating the Timberline DSN
The first step in the process is to establish the ODBC DSN to connect to the database. This involves a number of steps of a somewhat technical nature as outlined below.
- Copy the DDF files into the data directory.
- Locate the Timberline Program files on your server. These should take the stucture SAGE\TIMBERLINE OFFICE\9.5\ACCOUNTING. Under this accounting folder should be a variety of folders that go to make up the Timberline Application suite.
- Under the above folder structure will be a DDF folder. Locate this folder and select all of the files in this folder and select them all and copy them to the top level folder for your timberline data.
- Create the DSN
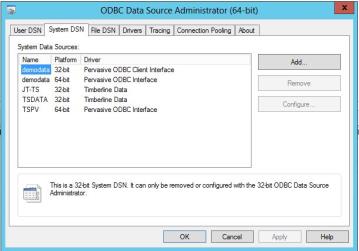
- From the start button, choose "RUN" and then in the run box type ODBCAD32
- From the Dialog slect the System DSN tab and then select "Add"

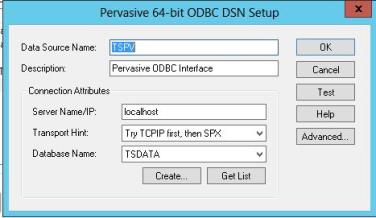
- Fill in the parameters as listed in the screenshot below.

- After filling in the Database Name choose "Create" and browse to your Timberline data folder.
- Once the "Create" process is complete, select the test button and make sure you get a "Connection Successful!" message, if not do not proceed until you do.
Create the Linked Server
Creating the linked server allows reports to access the Timberline from the context of the CRM database server. To create the Linked Server follow the following procedure, but only after completing the creation of the ODBC DSN above.
- Open SQL Server Management Studio on the CRM Server.
- Expand the Server Object section of the Database Server tree.
- Right Mouse Click on the Linked Servers node and choose "New Linked Server"
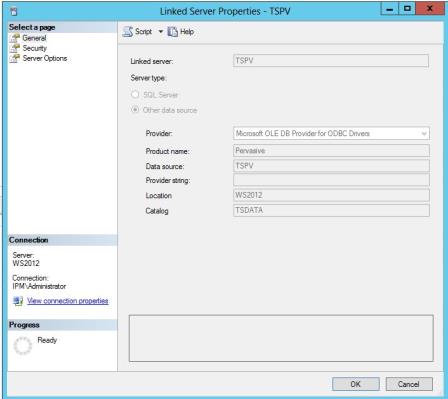
- Complete the parameters as shown below.
-

- Click OK and if there are no errors shown then you now have a linked server.
This Linked server can be referenced in SQL Queries using syntax like the following :-
Select * from [TSPV].[TSDATA]..[CURRENT_JCT_R1] which will return all of the entries in the Current Job Transaction table. Be aware that there may be some manipulation of the Job and Cost Code values from IPM required to align with the codes shown in the retrieved Timberline data.