Installation
System Requirements
In order to correctly install and use IPM Mail Manager, the following system requirements must be met:
Prerequisites
- IPM V5.1.0.1 or later must be installed and working correctly
- You need a POP 3 email account : Appendix A
- CRM eMail Router needs to be installed and configured : Appendix B
- You must set up a dedicated CRM user as the mail manager user identity
Installation Procedure
- Copy the IPM Mail Manager.zip file to desktop of the CRM Front end server. Unzip the contents and run the setup.exe file and follow the prompts
- When you get to the Set Service Login enter the domain name and a user that has system administrator role in CRM
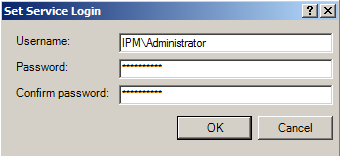
Running the Setup executable file installs the IPM Mail Manager Service on the host server with the login account for the service set to use the windows credentials you enter in the Set Service Login dialog (above). This account needs permissions to run the service, read and write to the log file and the registry. Therefore it should be a domain or local admin user.
The default installation directory is:
C:\Program Files (x86)\IPM Global\IPM\IPM Mail Manager.
A log file can found at:
C:\Program Files (x86)\IPM Global\IPM\IPM Mail Manager\Logs
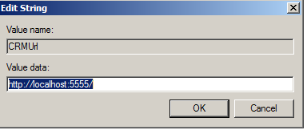
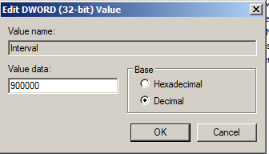
- A registry entry is created in the following location after you start the Windows service for the first time: HKEY_LOCAL_MACHINE\SOFTWARE\IPM Global\IPM Mail Manager

The default values are simple placeholders. After the Registry keys are created, you must modify the values as follows:
CRMUrl : This should be the web services UIRL string that correctly connects to the CRM Discovery Service for your CRM deployment. Note: If your CRM is IFD deployed the URL string will uses ‘https’ . You should be able to get the correct URL string for this from Settings> Customizations > Developer Resources. Ie. https://dev.domain:port
Interval: This value determines the interval period between the service polling the pop3 mail box . The default decimal is 900000 milliseconds (15 minutes). You can set this to a lower value for testing but once the service is in production mode, it is recommended that a longer interval is used to reduce load on the server resources.
orgName: This is the Organisation name of the database as it appears in the CRM Deployment Manager.
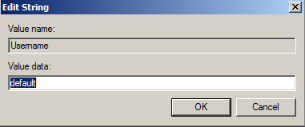
Username: This is the name of the CRM user who will be impersonated in order to update the RFI and RFQ records in the CRM org database. This user requires read and write permissions to the IPM RFI, IPM RFQ and IPM Mail Settings entities. For ease of use it is recommended that the CRM user here is the same as the user selected as the Mail user in Step 5.
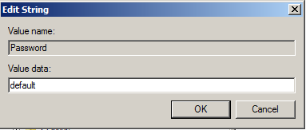
Password: This is the password for the user specified in the username field.
- In CRM, Go to Settings à IPM Configuration à IPM Mail Manager Settings
![]()
- Click on new, to make a new IPM Mail Setting record. Enter in the details of the POP 3 email account you are going to use for this application.
Note: At present the IPM Mail Manager Service is only supported for connections on pop3 mailboxes. That is the only option available in the settings below. (Exchange mailbox support is under development)
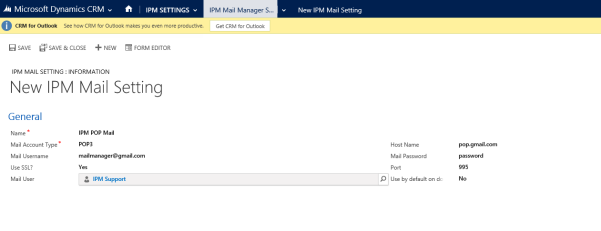
Note: You must set up a dedicated CRM user as the mail manager user identity. The Primary email address in User settings for this CRM user must match the email address in the Mail Username field above. This crm user must be configured to use the CRM email router as its email handling method for outgoing email.
- At time of writing the IPM Mail Manager Service does not support connections to Exchange Mailboxes later than Exchange 2003. Therefore for installations where the client is using a later version of Exchange, we recommend setting up an external mailbox using a free web mail service. The Mail Manager Service has been tested successfully with a Gmail POP mail box so if you must use this mail box type. You will to need to change the email address of your dedicated CRM user to the Gmail email address as in your Mail Manager settings in Step 5.
- When you configure your email router, you must sent up an outgoing profile to relay through your web pop/smtp mailbox so when the external recipients reply to the RFI/RFQ mail , the reply email address is the same as the one in Mail Manager settings.
If you use a Gmail account as previously discussed, the format required in your outgoing email profile in your router settings will be as follows. (Note that the mail server name and port for these settings are different from the POP3 mail connection discussed above at step (5)
Email Server type: SMTP
Email Server: smtp.gmail.com
SSL selected
Port: 587
user name and password = credentials for your mailbox.
(for: Gmail -drop ‘@gmail.com’ from the user name )
See http://www.paessler.com/knowledgebase/en/topic/2823-can-gmail-google-apps-be-used-for-smtp-relay
Ensure that there is no incoming profile setup on the email router for the email used by the mail manager. An incoming profile will scan the mailbox messages regularly and can interfere with the mail manager being able to collect these messages before they’re manipulated by the email router.
Also there can be problems running the email router on the same server where ADFS is installed. Conflicts are created between the 2 services. It requires a registry change. Refer to the following for those settings changes:
http://mscrmuk.blogspot.com.au/2012/04/crm-email-router-errors-with-adfs.html
Important: If you need to change the primary email address of your dedicated CRM user in CRM User settings to the address of an external mailbox, make sure you approve the new email address ( if required by your global CRM settings ) otherwise the user may not be recognised by the email router set-up.
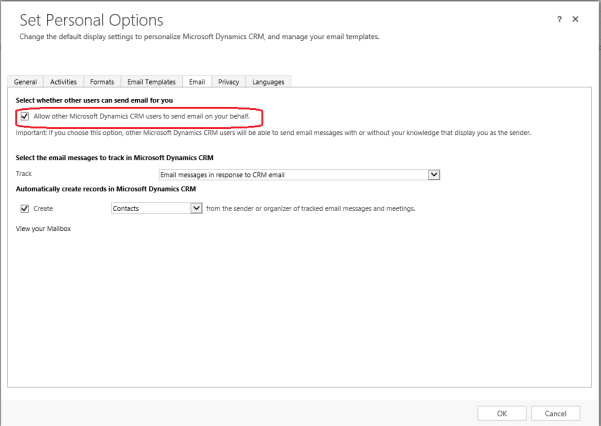
- Log on to CRM as the user created to run the Mail Manager Service.
- Go to file > Options > Set personal Options > Email
Tick the box to allow other user to send email on your behalf. This is only visible if the user has the email router selected as the method for sending email in the CRM User Settings.
And fill in the section to allow the email router to use the mail manager user’s credentials