Merge to Dynamics CRM 2016 Word Templates
INTRODUCTION
This document summarises the process of creating a Word Merge template in Dynamics CRM 2016.
TO CREATE A CRM 2016 WORD TEMPLATE
The first step varies depending on whether you are a System Admin or a User.
To create a Word template as a CRM Admin:
- As CRM System Administrator, navigate to Settings / Templates / Document Templates.
- Click New.
To create a Word template as a User:
- Navigate to the entity you want to begin your Word document from (RFI, RFQ, Variation request, etc.)
- Highlight an existing record in the entity (be sure not to click on any text as this acts as a hyperlink)
- Click the ellipsis (...) to find “Word Documents” and select “Create Word Template”.
From either location:
- Select “Word Template”, and select the Entity that will be the “main entity” for this Word merge. In this example the “main entity” is an RFI.
-
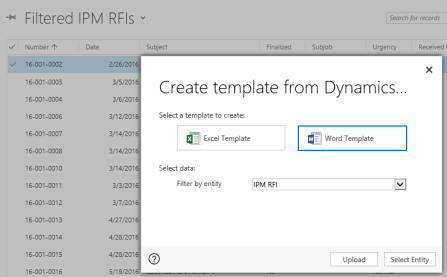
Click Select Entity. -
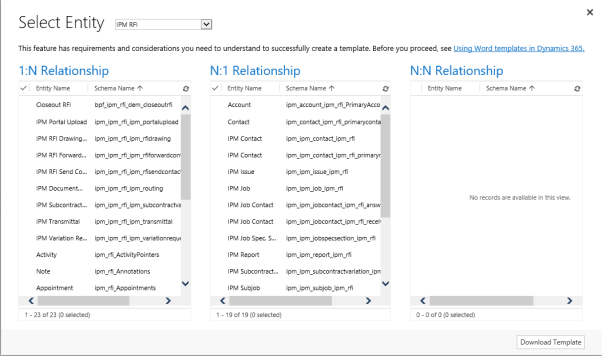
This page will vary depending on which entity you have selected.
You will always be shown these three columns which identify the relationships between your selected entity and all other related entities. In IPM, typically only the 1:N (one to many) and N:1 (many to one) relationships are used, as there are few situations where a N:N (many to many) relationship is required.
- This example is for creating an RFI, so the account, contact and job are required, as well as drawings that relate to the RFI. We will also add the user so that the RFI can have the name and contact details of the CRM user creating the document.
For this example the following entities were selected:
- From the 1:N list: IPM RFI Drawing
- From the N:1 list: Account, Contact, IPM Job, User
- Once you have selected the entity or entities you want to work with, click Download Template.
- You will see a document downloaded to your local systems. Click to open the document.
- Click Enable Editing.

MODIFYING WORD LAYOUT
To build the template you will need to make a change in Word to allow access to the Developer menu.
- Select File>Options>Customise Ribbon
-

Check the “Developer” box and click ok. The Developer tab will now show at the end of your menu.
- Click on the Developer tab and click “XML Mapping Pane”. The XML Mapping Pane will now appear on the right hand side of word. In the “Custom XML Part:” click the dropdown and select “urn:microsoft-crm” as the custom part.
MODIFYING EXISTING TEMPLATES
To ensure you do not have to rebuild templates that require modifications from scratch, ensure you upload each templates into the managed documents section in IPM!
If you wish to add fields that were not previously included in the entities that were selected when building the original template, you will need to follow the steps outlined on the first page of this document to select all necessary entities. Once you have your new blank template, you can simply copy and paste the old template onto here. You now only need to add in the new fields. The old template can now be deleted and replaced, and you can upload the updated template to the managed documents area for future access.

-
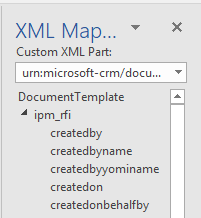
You can now see the main entity, and the fields can be shown by expanding this.
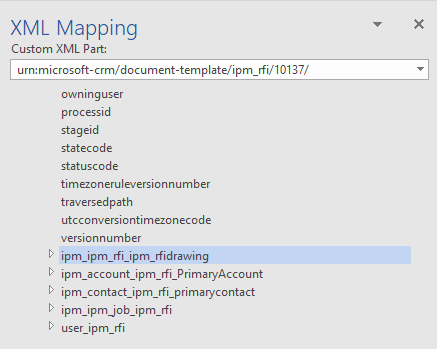
- By scrolling to the bottom, you can view all the related entities that were selected.
BUILDING THE TEMPLATE
You can choose to build a template from scratch, or simply copy>paste an existing design and edit the fields. This example will be using an existing template that just requires fields to be replaced. The process is the same if you are starting with a completely blank document.
-
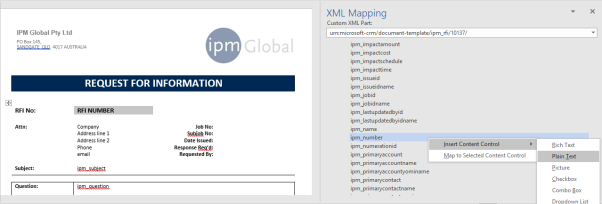
Highlight the first merge field, then find the correct field from your XML Mapping pane. Right click it, then select Insert Content Control>Plain text. Repeat this for all the merge fields.
Note: To replace an existing merge field, the original field must be deleted completely. You cannot highlight it and replace it with a new merge field like you can with regular text. To delete a field, simply highlight it and press the Delete button on your keyboard – alternatively, you can use backspace until the grey box disappears.
INSERTING A REPEATING TABLE
To create a table with multiple items of the same kind are to be inserted, a repeating table is required. In this example, a table for the RFI reference documents will be created.
- Create a table with two rows and your required number of columns.
- Add the fields that will be repeating in the second row of the table, using the same method as above.
-

Highlight the entire row and in the XML Mapping pane, right click the relationship name (Note that this is NOT the entity name) and select Insert Context Control>repeating.
This will place a blue plus sign at the right hand side of the repeating row in the table.

UPLOADING THE TEMPLATE INTO IPM
- In IPM, navigate to settings (red icon, NOT IPM settings), then select Templates>Document templates.
- Upload your template, ensuring you select the correct entity.
- Navigate to IPM Settings>IPM Reports
- Here you can choose to amend an existing report record or create a new one.
- In the “Name” field, enter the name of the template exactly as it appears in system templates, else the system will not recognise it.
- Ensure the “CRM Merge Report” checkbox is selected.
PERSONAL TEMPLATES
Personal templates can be used for several different reasons. If certain users have individual document templates that vary from the standard templates, these can be added as personal templates. Personal templates can also be a good way of testing new templates and sorting out issues before they are published as system templates.
ADDING PERSONAL TEMPLATES
- In IPM, navigate to the entity record to which the template relates.
- Highlight a record and select the ellipsis(…) and select Word Templates>Create Word Template>Upload
REMOVING WORD TEMPLATES
- Click the Advanced Find button in the top right corner of IPM (see screenshot).
- In the “look for” dropdown, scroll through the list and select “Personal Document Templates”.
- Click the red exclamation mark (!) to see all the personal templates.
- Select the templates to be deleted and press the trash can icon.